What do you think about when it comes to first aid? You probably think about just falling and cutting your knee or scraping your elbow. There are many other cases when it comes to first aid such as seizures, bee stings, splinters, and even bleeding from the head.
There is absolutely no way that you have not been hurt physically at least once in your life. If you have not, you deserve a cookie, but anyway, when people get hurt, the first reaction is panic. Don't lie, I know most of you do react that way sometimes. But learning how to properly treat the three types of hurry cases is very important because you never know when freak accidents happen. It could happen right now and if you know how to do this, then you're ahead of the game in a lot of ways.
About a year ago, troop 100 of the Boy Scouts of America participated in a First Aid Meet. This is when different troops go around and treat various first aid scenarios. I am very proud to say that we won second place because of our teaching methods.
The first thing that you will need to do is get all the supplies for the first aid kit.The equipment needed are as follows: medical tape, non-latex gloves, scissors, roller gauzes, gauze pads, mole skin, pen and paper, eight or so adhesive bandages, hand sanitizer, tweezers, alcohol swabs, triangular bandages, and antibiotic ointment.
And somehow I managed to fit all of these in a small bag!
Step One: The first hurry case is excessive bleeding. First, you need the first aid kit with everything but the kitchen sink. Then, you will need to check the scene.
A. Do this by making sure the area is safe for the victim and yourself. Next, like in every scenario, you need to treat for shock. Shock is just a fancy word for keeping the victim calm and relaxed.
B. Another way to treat for shock is to elevate the legs six to twelve inches.
Step Two: Now call 911! You are not a doctor. You are only there to temporarily help.
A. If you do not have a phone, have someone continue to treat the victim and have you and a buddy tell a trusted adult or leader to call them.
Now that you have assessed the situation and called for help, you will have to stop the bleeding.
Step Three: First, make sure you put on a pair of non-latex gloves before you begin. This will prevent sicknesses from the victim's blood infecting you.
Now, all of you are probably asking, "Why non-latex?" Well, some people are allergic to latex. So this way, the victim won't get a reaction because you don't know about his or her health history.
Step Four: Get out the gauze pads from your first aid kit and apply pressure to the wound with them. Again, apply pressure. Did I forget to mention, apply pressure?
A. Doing so will help stop the bleeding from coming out of the body. It also will help the wound heal a little faster.
B. It is also important that if the blood seeps through the gauze pads, don't replace them, just add more while you are still applying pressure.
Step Five: Next, take out your triangular bandages and wrap it around the head wound. This will keep pressure on the wound so you do have to.
A. Remember to still keep treating for shock while you are doing this. This would prevent the victim of passing out or hyperventilation.
Step Six: Once you have done this, wait for the ambulance and about a day later, you will be called a hero.
Now that you know how to treat for excessive bleeding, now it is time for ingesting poison.
There are two different forms of poison: liquid, or poisonous fumes. I will do poisonous fumes.
Step One: First thing, like the excessive bleeding, your need a first aid kit.
Step Two: Then, check the scene and make sure you are not harmed while treating the victim.
Step Three: Call poison control (800-222-1222)
Step Four: If you were ever affected by poisonous fumes, most likely, you are unconscious. So no need to treat for shock until full consciousness.
Step Five: Next, you need to take to victim to fresh air immediately! How you do it is by lifting the torso and dragging the body outside to either a shaded area or just outside.
Step Six: Make sure that the victim is breathing.
Step Seven: An easy way to find out if they are is to check their pulse or put your face above their mouth and look at the chest.
Step Eight: If the chest is rising or you can feel the air coming out, then they are breathing. Do not perform CPR unless they are not breathing and do not have a pulse. Just wait for the ambulance to come and make sure you keep the victim calm.
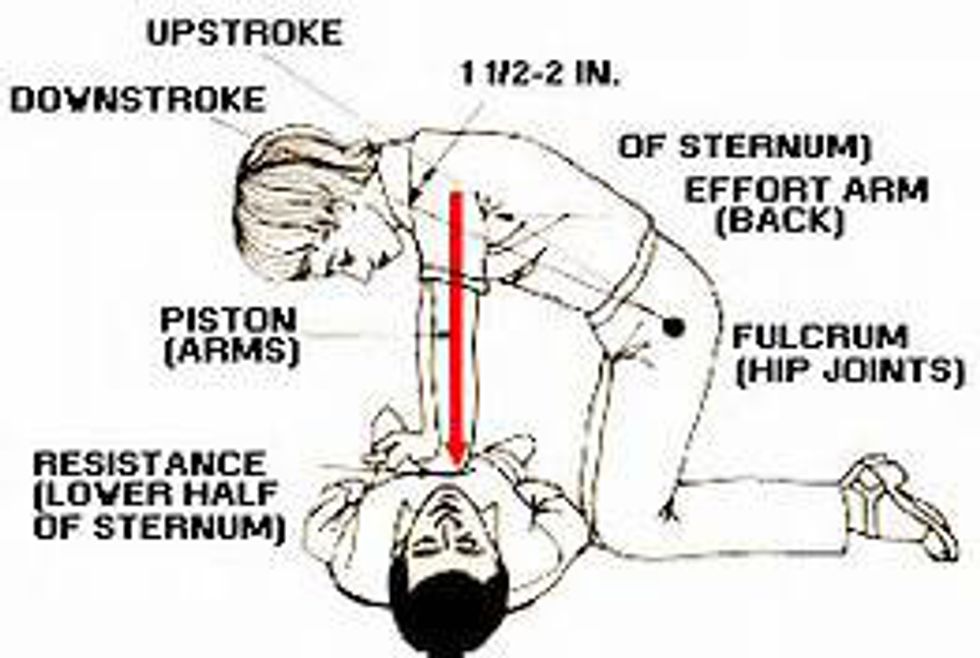
Step nine (only if not breathing): perform CPR. How to perform CPR is by cuffing your hands together (one hand spread out while the other goes through the fingers while going on the back of the hand) and put them in the middle of the chest and start pressing down on it approximately two inches deep for 30 compressions.
After that, check to see if the victim is breathing. If not, give two rescue breaths and 30 more compressions. The only time you stop doing CPR is: when medical professionals have arrived, the victim is breathing, or you physically can not perform CPR anymore.
So I hope you took this information and will use it for the future, because if you use it for a real life situation, America will need to wake up and give you a Noble Peace Prize. Trust me!


