It’s time for another step-by-step guide on how to bake! In my first session, I walked you through on how to bake cookies, which you can read right here
https://www.theodysseyonline.com/dummies-bake-cookies
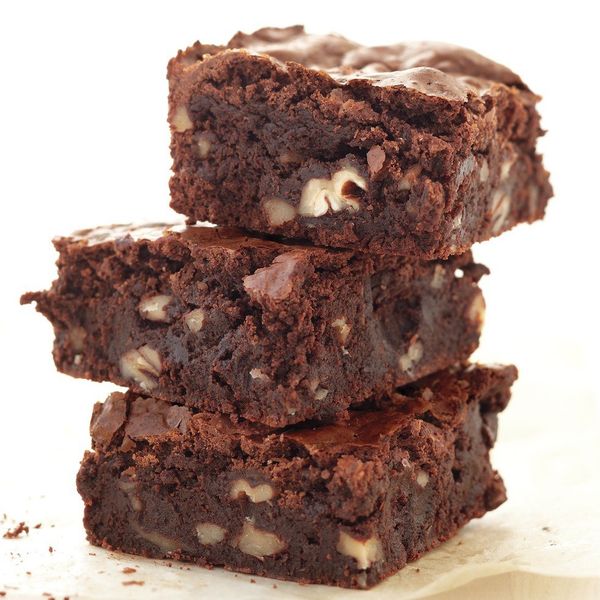
In this session, I am going to walk you through on how to make the perfect batch of brownies.
Because who doesn’t like brownies? These brownies will knock your taste buds out! Brownies that are so good you won’t believe me when I tell you that there is nothing in them. It’s just a damn good brownie. A brownie so good you’re going to want to have a seat to really enjoy it.
Now before I start this guide on the perfect brownies you’ve ever laid eyes on let’s get one thing clear. Chocolate cake baked in a square pan is NOT considered brownies. It’s cake. Cake in that was baked in a square pan. And nothing more. Now I’m sure it’s good cake because you can never go wrong with chocolate. It may even be a really yummy cake, but nonetheless, it is not brownies. So just because you bake chocolate cake in a pan you would normally bake brownies in, something like this
does not make it brownies. It’s cake. End of discussion.
Now that you know the difference between the two baked goods. Let’s get started on making these amazing brownies. To start you need yourself a good recipe. And don’t just google ‘Brownie Recipe’ because you’re going to get a lot of results. And I can already tell you that every other link or website is going to be called “the best brownies ever” or something along those lines. I mean chances are they could be good brownies. But claiming that your recipe for brownies is the best, when a bunch of other sites does it as well, doesn’t really cut it. You want to use a recipe from a well-known site. Specifically, one that is known for having many desserts on their site. Or just really common sites everyone has heard of. So this recipe is from a trusty recipe site I always use for all my baking. This recipe is from Allrecipes.com and what do you know, it’s labeled itself as “Best Brownie Recipe.” But in all honesty, this site has never let me down when I’ve used their recipe and I’ve made these brownies many times before. So I think it’s fair to say their title is on point.
So for this recipe you will need:
- 1/2 cup butter
- 1 cup white sugar
- 2 eggs
- 1 teaspoon vanilla extract
- 1/3 cup unsweetened cocoa powder
- 1/2 cup all-purpose flour
- 1/4 teaspoon baking powder
- 1/4 teaspoon salt
And if you’re a person who likes to put frosting on their baked goods, or likes frosting on their brownies, here’s a recipe for that as well. But just so you know, I won’t be walking you through on how to prepare it, let alone how to frost it on your brownies. You’re on your own with that. You’re also going to need a saucepan and a plastic knife. So bring those out as well.
Frosting Recipe:
- 3 tablespoons butter, softened
- 3 tablespoons unsweetened cocoa powder
- 1 tablespoon honey
- 1 teaspoon vanilla extract
- 1 cup confectioners' sugar
So now that you have found yourself a killer recipe, you need to make sure you have everything this recipe calls for before you get started on anything. Because if you start without making sure you don’t have anything you’re either A- going to have to ask your neighbor for some things (if you guys are friendly like that) B- going to have to make a trip to the supermarket. Or C- have a half of a brownie batter on your kitchen counter. And this kind of batter isn’t like cookie dough where you can just eat it. Because it won’t taste good. So do make sure you have everything.
To make this session of baking brownies smoother and a lot faster, I highly recommend taking out all your ingredients and baking tools and setting them on the kitchen table or on the counter but make sure to make to have some space for your mixing bowl, unless you are using a trusty kitchen aid mixer.
Now for most recipes, your butter needs to be soft or at room temperature. So a lot of the times you would place whatever amount of butter you need on the side at least half an hour before you start. But not for this recipe! You can get yourself started right away. No more long waits for butter to get soft.
To start, preheat your oven to 350 degrees F (or 175 degrees C). After setting your oven to preheat, get yourself a square pan, particular one that is an 8-inch.
(Something like this)
You’re going to take that 8-inch pan and grease it. You do this because you don’t want your brownies to get stuck to the bottom of the pan when you’re trying to take a piece of it. So you grease it with a little bit of vegetable oil. When I say a little I mean like a ⅛ teaspoon. Maybe even less. Unless your 8-inch pan is a non-stick pan, then you can skip the greasing part. Set your pan aside and remember how I said you’re going to need a saucepan. Set that on your stove. On low heat, not high, not medium, but low. Place your ½ cup of butter and allow it to melt. Do not let it boil or bubble. Once the whole stick of butter is melted remove it from the heat and set it down on a coaster. Grab a measuring cup and measure out your sugar. Once you’ve measured the 1 cup correctly, add it to the melted butter. Then add in both your eggs and also measure out 1 teaspoon of vanilla extract using your measuring spoons. Stir that all together with a wooden spoon. Make sure it mixes it well. You don’t want any clumps! Because clumpy brownies aren’t pretty. And if it’s not pretty, or satisfying enough to eat, no one will want it. Which is a plus because then there's more for you! So I guess it's okay to have clumpy batter, but it's best if you don't.
Now, take your measuring cup once again and measure of a ⅓ cup of cocoa powder adding it to the butter mixture, or whatever mixture. Call it whatever. Add it to the mixture where you placed your eggs, sugar, and butter. After adding the cocoa powder, measure out your flour, salt and lastly your baking powder and add it to the mixture as well.
Then mix it all together until it’s all blended with each other. You don’t want to see any signs of flour, sugar, or powder or any other ingredient for that matter. You want nothing but smooth, rich batter.
Once it’s all fully mixed, take your batter and pour it into your greased 8-inch pan. Make sure to use a spatula to take out all the mixture. Don’t be like those people on TV who pour in a little and leave almost half the mixture in the bowl. Don’t waste! Use it all. After you’ve poured all your batter into the greased pan spread it out evenly. You can also use your spatula or a faster technique, grab the sides of pan with both hands firmly and shake it. But GENTLY! Very gently. Treat it like jello. Just give it a little shake until all sides look even, you don't want any of it to spill because that's going to be another mess you'll have to clean. Doing this little shake of the batter helps it cooks evenly. You don’t want one side higher than the other. Or a lumpy batch of brownie.
Your oven should be ready since you pre-heated it before you started to make your batter so now you don’t have to wait for the oven to heat up. Take your pan of uncooked brownies and place it in the oven. Close your oven door nicely and set a timer for 25 minutes or 30. It depends on how well your oven is. But 30 minutes MAX! Do not overcook it. Overcooked brownies do not taste good at all or smell good for that matter. Now the hardest part is waiting for it to bake. During this time you can get some things done, but make sure wherever you go, that timer goes with you.
Once that timer goes off take it out. Place it on a rack and let it cool. But before you just leave it to cool take that plastic knife and just move around the edges of the brownies. Just so it won’t stick to the pan as it cools, even though you greased it. Here’s the second hardest part, waiting for it to cool down. It sucks I know. Because you spent a while preparing everything and mixing it all together, then there was the struggle of waiting a good half hour for these brownies to cook and having to deal with the aroma of brownies fill up your kitchen and nose and now you have to wait even more. Well, you waited this long, what’s a little more. This is a good technique to test your patience. Baking, in general, requires a lot of patience and skill, but who's really judging.
Once your brownies have warmed down a bit, this would be a great time to frost them if you chose to make the frosting. If not, take that plastic knife once again and cut the brownie batch into even squares. Using a plastic knife helps cut the brownies nicely so it won’t get all crumpled up and it won’t scratch up your pan which can ruin it. So use a plastic knife.
So there you have it! Your brownies are ready, they've cooled down and they've been cut. So there’s nothing really stopping you now from taking a few pieces and enjoying them.


